Monday, December 23, 2013

Bingo Squares

               After a long week of flu, we're back with another easy but tasty recipe. These squares are delicious - they are chocolatey but at the same time light and fluffy. The name Bingo Squares was inspired by the subtle combination of cinnamon, orange, chocolate and vanilla and I'm sure that bingo would be the first word that comes to mind when you taste them.


Ingredients:

Base

1 1/2 cup sugar
1 1/2 cup water
2 cups white flour
1 teaspoon baking soda
1 teaspoon cinnamon
3 tablespoons jam (here I used apricot jam but you could use any other jam)

Filling 1

300 gr. cookies or biscuits
2-3 cups of freshly squeezed orange juice

Filling 2 

250 gr butter or margarine
250 gr powdered sugar
4 packages of vanilla flavored instant pudding mix (I use Dr.Oetker pudding mixes)
15 tablespoons sugar
1 l water
100 gr chocolate + 50 gr for decoration


Directions:

1. Mix all of the base ingredients and bake the base in a greased baking dish for 20 minutes at 390°F (200 °C). 

2. Crush the cookies and put them in some orange juice. Stir until combined. If you like smooth fillings you could also ground the cookies or put some extra orange juice. I left mine crushed as they add a bit of texture to the squares. The amount of orange juice can also vary depending on your preferences.

3. In a larger pot cook 4 packages of instant pudding mix with 15 tablespoons of sugar and 1 l water, stirring continuously.  Once the pudding starts to gently simmer, reduce the heat and cook for another minute. Remove from the heat and let it cool completely. 

4. Cream the butter with the powdered sugar and add it to the cooled pudding. 

5. Divide the second filling in two equal parts. In one of the parts add 100 gr melted chocolate.


Assembling

Put the first filling on the base and continue with the vanilla flavored part of the second filling. Finish with the chocolate layer and sprinkle some chocolate shavings.


Hope you'll enjoy our recipe! 

Have a wonderful time filled with happy memories together with your loved ones. 

Merry Christmas! 

Linking to:

The Inspiration Gallery 

A Bowl Full of Lemons
Yummy Healthy Easy

Monday, December 16, 2013

Roasted Rabbit

                    Hello everyone! Today's recipe is a change in our everyday menu since we rarely buy and cook rabbits. But the simplicity of this recipe and the final result make me think about including it in our diet more often. It takes less than 15 minutes to prepare and requires only a few essential ingredients that most households already have. Here's what you'll need:

Ingredients:

1 whole rabbit
2 onion heads
2 carrots
3 garlic cloves
salt 
pepper
1 tbsp mixed dried herbs
1 1/2 cups water
2 tbsp olive oil

Instructions:

       1.Wash the rabbit thoroughly and dry it.
       2.Cut the onion and carrots into larger chunks and crush the garlic cloves. 
       3.Make small cuts in the meat and stuff them with the onions, carrots and garlic. 
       4. Season the rabbit with salt, pepper and mixed herbs.
       5. Place the rabbit in a greased baking dish and add the water.
       6. Cook covered with aluminum foil in a preheated oven at 390°F (200 °C) for 1 hour or longer, depending on the rabbit's size. 
       7. When the meat is tender, cook uncovered for additional 15 minutes until you get a crispy, golden exterior.


 Enjoy!

The DIY'ers 
Love Grows Wild

A Bowl Full of Lemons
Photobucket

Friday, December 13, 2013

Fashion Friday - Comfortable OOTD

  Hello everyone! Christmas preparations are in full swing and we've been running errands all afternoon. 
Since my toddler loves driving around town I took her with me and here's what she wore.


As we needed something comfortable but also stylish, I decided to dress her in these comfy jeans and paired them with this purple hooded sweater and one of the cutest vests I've ever seen. Unfortunately I only managed to snap one photo before we left the house and was unable to take some more afterwards because she spilled all of her freshly squeezed orange juice onto her clothes. Ah, the joys of motherhood! :)

Enjoy the weekend!


Monday, December 9, 2013

Cleaning Monday - Remove stains from pots

Welcome to another Cleaning Monday! Today I wanted to share with you one of the best ways to clean stains for your pots. This is especially helpful if you don't have a dishwasher or some of your pots are not supposed to go in the dishwasher. 
In the local Red Cross Center where I help out once a week, there is no dishwasher and all of the dishes, pots and basically everything is hand washed. We use them a lot so they get water stains all over and don't look pretty at all. What I like to do once in a while is boil them with water and laundry detergent - no other cleaning product is as efficient and available as this one. First you need to fill up the pot that you would like to clean and put some detergent in (I usually put half a teaspoon of detergent for smaller pots up to a teaspoon for larger pots). Once it starts boiling lower the heat and let it boil for 15 more minutes. Afterwards, rinse thoroughly with warm water and that's it. 

If you want to clean the outside of the pot, take a larger pot and fill it with water and some detergent. Place the pot you want to clean but be careful not to submerge any plastic parts in the solution. Here are the end results:


  Quick, easy and budget-friendly! 

Have a great week!

Linking to:


The DIY'ers
 
A Bowl Full of Lemons

Sunday, December 8, 2013

Sweet & Savory Sunday - Tasty Meat Patties

Hello everyone! I hope you are eager to try another tasty traditional recipe. This recipe has been in our family for a long time and my mom and grandma used to make these patties very often. Nowadays we don't eat meat that much so this recipe is a delicious change in our everyday menu.


The ingredients:

500 gr. minced meat seasoned with a bit of ground paprika
100 gr. bread crumbs
1 clove garlic
1 onion
1 handful parsley
1 egg
100 gr. of bacon (optional)
 1/2 teaspoon baking soda
salt
pepper
vegetable oil (or butter) for frying


 Mix the ingredients in a larger bowl with your hands until the mixture is smooth and the ingredients are well combined, and shape the patties. Heat some vegetable oil (or butter) in a skillet and brown the patties on both sides over medium heat. Place the patties on a paper towel to remove excess oil.


Mouth watering, isn't it? Enjoy!

Linking to:


Love Grows Wild
A Bowl Full of Lemons
  Photobucket

Saturday, December 7, 2013

Fashion Friday - Birthday party Outfit

It's time for another Fashion Friday which is fashionably late. But since the birthday party that we attended yesterday lasted longer than expected, this post will be a Saturday morning inspiration. I'll let the photos speak for themselves.


 Don't you just love these cute little ankle boots paired with shorts? 

Have a fun weekend!


Wednesday, December 4, 2013

Words of Wisdom Wednesday - Postpartum hair problems

Today's Words of Wisdom post is something that I'm sure most new moms have experienced - hair loss and changes in the overall look and hair health. During my pregnancy I was shocked how my hair, nails  and skin looked AMAZING. Of course hormones had a lot to do with it as well as the vitamin supplements I was taking at the time. I was so happy to finally have thick and shiny hair that was manageable and easily transformed into different hairstyles, but little did I know that the happiness is not going to last for a long time.

Shortly after I gave birth, around the three month mark I started loosing a lot of hair. And by a lot I mean chunks of hair everywhere, on my clothes, my pillow... That was a scary experience for me. In just two weeks time I noticed bald spots on my head, so I figured it was time for me to visit my doctor and try to find solution to this problem.

I always thought that I lost a lot of hair because I was breastfeeding, but I was wrong again. It was actually the imbalance of hormones in my body after I gave birth that caused my hair loss, but in my case it was pretty dramatic so the doctor recommended I get a few things to stimulate the growth of new hair and preserve the remaining. Here are the things that worked for me:

1.The first thing was taking a vitamin supplement. My doctor recommended the MERZ spezial vitamins which are a formula aimed at improving hair, skin and nail health. After three months of using them I can say that they have helped me stop loosing hair and my hair is shinier than ever. My nails that were always so fragile are now better than ever and I've noticed a change in my otherwise dry skin.


2. Getting a new good quality shampoo is also very important. The doctor's recommendation was ALPECIN hair Energizer - and let me tell you this thing is pretty amazing. Just after a short time I noticed a lot of new hairs and I didn't need to use additional products to create volume.


3. Last but not least, and actually most important is the DIET - include a lot of vitamin C packed fruits, green leafy vegetables and iron rich foods. Make yourself a green smoothie so that you will get all the nutrients in one glass. Beauty comes from the inside and tweaking your diet might be the only thing you need for great hair.
These are the changes that I've made and that have helped me immensely. Six months after using these products my hair looked a lot better. I am still working on achieving the state where I want my hair to be but so far I am happy with the fact that I can proudly wear it down. 
 
If you are experiencing hair loss please check with your doctor first to determine the cause and treat the problem accordingly.  I hope this was helpful.

Have a great day!


Sunday, December 1, 2013

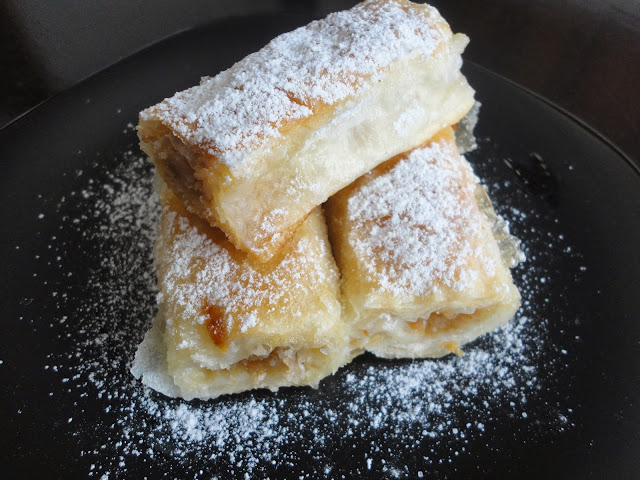
Sweet & Savory Sunday - Easy Phyllo Apple Walnut Rolls

              Hello everyone! I hope you're having a lovely weekend and enjoying some time off as much as I am. It's been snowing for a few days now and I love how relaxed and calm the snowflakes make me feel. Since we spent most of the time outside I needed a quick and easy recipe for an afternoon treat. I had delicious organic apples from my grandmother's farm and immediately thought of Apple Walnut Rolls.


The ingredients:

500 gr phyllo sheets
200 ml vegetable oil
300 ml sparkling mineral water
1 package baking powder
1 kg apples (peeled and grated)
200 gr ground walnuts 
1 tablespoon round cinnamon 
sugar (you can replace it with another sweetener or leave it out altogether) 
powdered sugar for dusting

Instructions:

Mix the oil, sparkling water and baking powder in a cup and set aside. Take a sheet of phyllo dough and brush the oil, water and baking powder mixture over the sheet. Take a second sheet and carefully place it over the first one, brushing it with the mixture. Repeat the procedure with a third phyllo sheet. 
Mix the grated apples with the ground walnuts and 1 tablespoon of cinnamon. Spread the apples at one end of the phyllo sheet. Add sugar or any other sweetener if you decide to use it.


Roll the phyllo sheets and place the roll in a greased baking dish. Repeat the procedure with the leftover phyllo sheets and apple filling.


When the baking dish is full, apply the leftover oil, water and baking powder mixture on each roll. Cut the rolls into smaller pieces and place the pan in a preheated oven at 200 degrees Celsius (390 degrees Fahrenheit). Bake for 30 to 45 minutes until the rolls become lightly golden brown. 


Let the rolls cool for a bit and then dust them with some powdered sugar.


There are a number of variations for the apple filling - you could use hazelnuts or almonds instead of walnuts, add raisins, cranberries or any other dried fruit. You could also add ground cookies or biscuits, or even change the apples with cherries or pears. The possibilities are endless but they all yield a super easy and delicious treat for both the kids and the adults in the family.

Enjoy!

Linking to:


The DIY'ers
Photobucket
Love Grows Wild
A Bowl Full of Lemons

Friday, November 29, 2013

Fashion Friday - Festive OOTD

                 Holidays and celebrations are the perfect time to wear beautiful festive dresses. Today's baby outfit of the day includes one of my favorite dresses - it's suitable for any special occasion, it's cozy and soft and very low-maintenance. The shoes are also soft and can be washed in a washing machine which is always a bonus. Here are the details.


Have a lovely weekend!


Wednesday, November 27, 2013

Words of Wisdom Wednesday - Car must-haves for mommies

  During the holiday season we usually visit a lot of friends and relatives which means a lot more car rides as well. Even though I always take my diaper bag wherever we go, I also keep a small kit of essentials in the car just in case. The kit is pretty simple and contains only a few items so it doesn't take up a lot of space. 


1. Antibacterial wet wipes
 
2. Bottled water

3. Sandwich bags - I use these for food leftovers or when I do a quick clean-up of the car.

4. Hand sanitizer

5. Toys - I change the toys once a month or sooner if I notice that they are damaged or that my daughter has lost interest in them.

6. Snacks

I usually check the kit on Sunday to make sure I have it ready for the week and refill it once I run out of an item. 

Do you have a car kit? Which items do you keep in it? I would love to read your comments. 

Happy Thanksgiving and have a lovely time with your loved ones!


Sunday, November 24, 2013

Sweet & Savory Sunday - Decorative Chocolate Coco - Hazelnut Bombs

                With a lot of holidays and celebrations coming our way, ideas and inspiration in terms of food are more than welcome. I've been making this recipe for quite some time now, but I've always shaped them like truffles. Then my sister suggested using a silicone mold to make them more decorative and eye-catching. So here is the end result:


 You'll need:

100 gr. coconut flakes
100 gr. ground hazelnuts
100 gr. ground store-bought biscuits or cookies
100 gr. powdered sugar
the juice of 1 orange
200 gr. dark chocolate


Mix the coconut, hazelnuts, biscuits and powdered sugar in a bowl. Slowly add the orange juice and mix the ingredients well. 

Melt the chocolate in a double boiler pot. Carefully pour enough chocolate in the silicone mold to coat the base and the sides of the mold and put it in the freezer for 5 minutes. Take the mold out and fill it with the coco - hazelnut mix. Finish with a layer of melted chocolate and freeze. After the chocolate hardens carefully pop the cookies out of the mold. 


They are easy and delicious. 


Bon appétit!

Linking to:


The DIY'ers


A Bowl Full of Lemons
Photobucket
Related Posts Plugin for WordPress, Blogger...